I recently came across Ajax upload; a bit of javascript that allows users to drag and drop files from their computer into an area on a web page, and those files to be uploaded to the server. It looks quite nifty and I thought it would be a nice addition for my SharePoint 2010 site.
How does the upload script work?
The first step to take was to figure out how Ajax upload works. After checking the site and examples, comments, etc, it turned out that for each file dragged/chosen for the uploader, a separate POST request is sent to a location you specify containing the file to be uploaded. The script then awaits a JSON success message to come back.
A little gotcha to this was that the location of the uploaded file is stored differently in the Request object depending on the browser that is used. For IE, we need to check the Request.Files collection and for other all other browsers we check Request.InputStream. I'll come to this later.
Aspx Page Setup
So to get the uploader up and running, I created a FileUploader.aspx page (not very original I know) which will show an upload form to the user as well as accept post requests for uploaded files i.e. it will post uploads to itself. For my own purpose, the page expects a queryString param of "destination" to be present, this contains the destination of the SharePoint folder the files should be uploaded to.
I've added a div with id="fileuploader" in this page which will be the drag and drop area ajax upload will work with. I then added the javascript below to initialise ajax uploader. "this.FolderLocation" is a a server side page property set on Page Load, retrieved from the query string as we will see later. The styles used by ajax uploader can easily be changed via the css file associated with it and the classes the uploader uses can be changed within the setup javascript. I added an extra parameter for ajax uploader to send on each post which is "destination", this is the complete link to the file location the uploaded file should be placed. At the moment, the file will be automatically overwritten if it already exists, but you could add an optional parameter at this point to be passed with each POST request to specify true or false for this action.
function SetupUploader(destination)
{
    var uploader = new qq.FileUploader({
        element: document.getElementById('fileuploader'),
        action: '/_layouts/myWebApp/FileUpload.aspx',
        onSubmit: function (id, fileName) {
            uploader.setParams({
                destination: destination + fileName
            })
        },
        template: '<div class="qq-uploader">' +
            '<div class="qq-upload-drop-area"><span>Drop files here to upload</span></div>' +
            '<div class="qq-upload-button">Upload a file</div>' +
            '<ul class="qq-upload-list"></ul>' +
            '</div>',
        classes: {
            // used to get elements from templates
            button: 'qq-upload-button',
            drop: 'qq-upload-drop-area',
            dropActive: 'qq-upload-drop-area-active',
            list: 'qq-upload-list',

            file: 'qq-upload-file',
            spinner: 'qq-upload-spinner',
            size: 'qq-upload-size',
            cancel: 'qq-upload-cancel',

            // added to list item when upload completes
            // used in css to hide progress spinner
            success: 'qq-upload-success',
            fail: 'qq-upload-fail'
        },
        onComplete: function (id, fileName, responseJSON) {
        }
    });
}

$(document).ready(function () {
    SetupUploader('<%= this.FolderLocation %>/');
});
Page Html
For completeness, the layout code below was used (minus register tags), you can see the "fileuploader" empty div present ready for JQuery to be applied to it.
<asp:Content ID="AdditionalHead" ContentPlaceHolderID="PlaceHolderAdditionalPageHead"
    runat="server">
    <SharePoint:ScriptLink ID="ScriptLink2" runat="server" Name="Styles/myWebApp/js/jquery-1.6.1.min.js" />
    <SharePoint:ScriptLink ID="ScriptLink1" runat="server" Name="Styles/myWebApp/js/custom/fileUpload.js" />
    <SharePoint:ScriptLink ID="ScriptLink5" runat="server" Name="Styles/myWebApp/js/fileuploader.js" />
    <link type="text/css" rel="stylesheet" href="/_layouts/1033/Styles/myWebApp/fileuploader.css"title="normal" media="screen" />
    <link type="text/css" rel="stylesheet" href="/_layouts/1033/Styles/myWebApp/styles.css" title="normal" media="screen" />
</asp:Content>
<asp:Content ID="Main" ContentPlaceHolderID="PlaceHolderMain" runat="server">
    <script type="text/javascript">
        $(document).ready(function () {
            SetupUploader('<%= this.FolderLocation %>/');
        });
    </script>
    <table border="0" cellspacing="0" cellpadding="0" width="100%">
        <tr>
            <td>
                <wssuc:inputformsection runat="server" title="Upload files" description="Browse or drag and drop the files you would like to upload. These will overwrite any existing versions.">
                    <template_inputformcontrols>
                        <table width="600px">
                            <tr>
                                <td valign="top" style="width: 50px">
                                    Destination
                                </td>
                                <td>
                                    <%= this.FolderLocation %>
                                </td>
                            </tr>
                            <tr>
                                <td valign="top">
                                    Browse or drag and drop files:
                                </td>
                                <td>
                                    <div id="fileuploader">
                                 </div>
                                </td>
                            </tr>
                        </table>
                    </template_inputformcontrols>
                </wssuc:inputformsection>
                <div class="C_DASHBOARD_DIALOG_DIALOG_BUTTONS">
                    <div class="C_DASHBOARD_DIALOG_DIALOG_LINK">Close</div>
                </div>
            </td>
        </tr>
    </table>
</asp:Content>
Server Side setup
public partial class FileUpload : LayoutsPageBase
    {
        // our folderLocation page property used in the client for ajax upload
        public string FolderLocation
        {
            get
            {
                return ViewState["FolderLocation"] != null ? ViewState["FolderLocation"].ToString() : "";
            }
            set
            {
                ViewState["FolderLocation"] = value;
            }
        }

        protected override void OnLoad(EventArgs e)
        {
            // If no POST has occurred, its just the initial load of the page, so set the page property from query string
            if (Request.RequestType != "POST")
            {
                FolderLocation = Request.QueryString["folderlocation"];
                return;
            }

            // the post request should have a destination param, return an error if not
            if (Request.QueryString["destination"] == null)
            {
                WriteResponse("{\"success\": false, \"error\": \"wrong or missing parameters\"}");
                return;
            }
            AddDocument();
        }

        private void AddDocument()
        {
            // Get the stream object by checking Files collection or InputStream
            Stream fStream;
            if (Request.Files.Count > 0)
                fStream = Request.Files[0].InputStream; //IE does this
            else
                fStream = Request.InputStream;

            // This is actually in my service layer, moved here for completeness
            using (SPSite site = new SPSite(Request.QueryString["destination"]))
            using (SPWeb web = site.OpenWeb())
            {
                web.AllowUnsafeUpdates = true;
                web.Files.Add(Request.QueryString["destination"], fStream, new SPFileCollectionAddParameters() { Overwrite = true });
                web.AllowUnsafeUpdates = false;
            }
            // important to return true success for ajax upoad to act correctly
            // can also wrap above in try catch and return error in catch
            WriteResponse("{\"success\": true}");
        }

        private void WriteResponse(string output)
        {
            Response.Clear();
            Response.ContentType = "text/html";
            Response.Write(output);
            Response.End();
        }
    }
See if it works
So we have our client side script in place, our back end code deployed as well as the page template itself residing in the layouts folder, so we should be able to upload some documents via drag and drop. I've pasted in step by step demo in pictures below:
 |
| Step 1: Dragging files, the ajax uploader changes to red area to drag onto |
 |
| Step 2: Upload in progress |
 |
| Step 3: Upload complete, Firebug shows the 2 seperate POST requests |
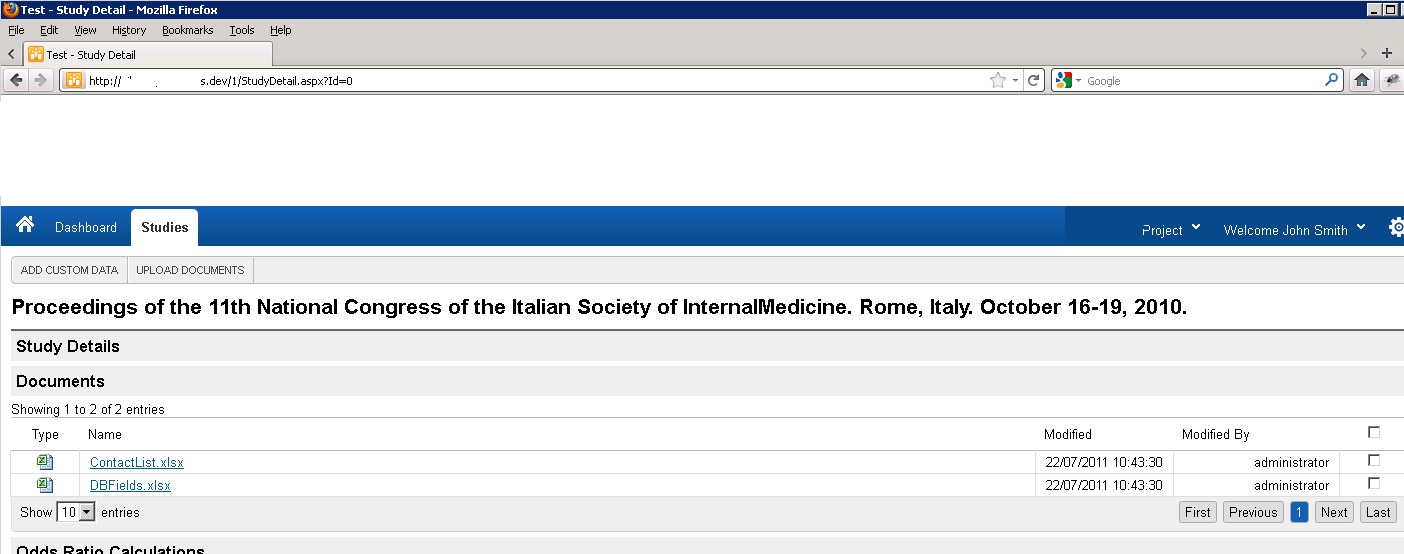 |
| Step 4: Documents shown in the library (via custom user control using datatables) |
Summary
I hope this has shown how we can easily add a bit of value for the end user by enabling drag and drop file capability for SharePoint without too much fuss. There are quite a few options for ajax uploader that can be utilised, such as "allowedExtensions" to limit file types, or "sizeLimit" for a size cap on files, just check the documentation for more information.